Categories
Finance Getting Your Finances in Order in Your 20's

Getting Your Finances in Order in Your 20’s: Emergency Fund & High Yield Savings Account

A very important step towards financial independence is an emergency fund. It can be hard to take this step when you’re living paycheck to paycheck, but it’s such a relief to have that safety net. Eventually, you’re living paycheck to paycheck with a couple thousand of backup dollars which is a very different experience. There are no hard and fast rules to get there, but here are some guidelines.

First, lets start by talking about priorities. You will never achieve financial freedom without first evaluating your priorities. We’ve talked before about using Credit Cards to your advantage, paying off Student Loans and other debts, and about Planning for Retirement. All of these things are important and could rank higher in your priorities than an emergency fund. I would recommend prioritizing keeping your credit card debt at zero and paying off your loans aggressively. However, planning for retirement and emergencies are both forms of planning for the future and you may find a balance between them as priorities. Of course, required bills like rent, utilities, food, etc. have to be top priority, but you must be careful to differentiate between needs and wants. It is hard when you’re just starting out to live below your means and resist temptation. It is important though so you can build up funds for a rainy day.

Second, you need to commit to treating your Emergency Fund like an Emergency Fund. Basically, once you put money in, you are not allowed to take any money out for any reason. Now, I’m clearly exaggerating slightly, but I choose to think of my Emergency Fund as untouchable money. That way I truly only use it for emergencies. I haven’t needed to touch it even when I had periods between jobs. I would find other ways to afford my bills first. If it comes down to not paying a bill or incurring debt, then its time to tap into your emergency fund as needed. Adjust this mentality to what works for you.

Ok now that you have evaluated your priorities, let’s get to it. It may be difficult to know where to start. Let’s break it down into goals.

Goal #1: Aim to have $1,000 in your account.

              It may not seem like much, but it is an achievable goal. You will also be relieved to have it if you ever need it. If you do have to use it for an emergency, make sure to prioritize restarting your goal. While you have achieved goal number 1, don’t stop contributing to your account. Then you’ll be on your way towards achieving goal number 2.

Goal #2: Aim to have the amount equal to 6 months of expenses.

              This is an ultimate goal so if you need to make another smaller goal between the 1st and 2nd goal, then go right ahead. These are guidelines so adjust them to what works for you, but don’t give up. To achieve this goal, you need to sit down and evaluate your finances again. Hopefully, you have a budget in place that you’ve been using for a while. That information will make this step much easier. Be honest with yourself and don’t try to undercut your number. If you ever need to rely on this money, you will be glad you funded it properly.

First, take your housing cost, high average of your utilities, your cellphone and Wi-Fi bills, enough for refills on fuel, groceries, and required monthly payment for your loans plus the amount you have chosen to avalanche your bill like we discussed in our Student Loan Repayment article. Once you have added all these up and double checked that you haven’t forgotten a monthly expense, you will multiply it by 6 so that you then have the amount of 6 months expenses and your goal amount. I would recommend rounding up to the next round number. That way you have a little wiggle room and its easier to remember. Again, if you ever use any of the money from your Emergency Fund for an emergency, then you should restart when you can until you hit your goal again.

Once you have hit your goal, forget about it like I said before. Using your Emergency Fund should be strictly an absolute last resort. You can have another saving fund for things like new phones, cars, and other wants. After you hit your emergency fund goal, you can give more focus to other goals like retirement and paying down debt.

Benefits of a High Yield Savings Account

Something I wish I had known about years ago is a High Yield Savings account. Until last year, I had just been using the Savings Account and Money Market Account that came with my Checking Account. This was fine because it helped me sort my funds into an “untouchable account”. The Savings Account was fine for this purpose, but it only gained $0.01 in interest which doesn’t even keep up with inflation. Last year I discovered High Yield Savings that have interest returns close to 5%! This is a game changer. Once you begin your Emergency Fund, it will grow in small ways on its own. Imagine that! It is like a little reward and helping hand for taking the right step.

I personally use the CIT Bank, but there are lots of options. I saw that Credit Karma from Intuit has one, and there are plenty of others. Just make sure that you are clear on the minimum required deposit and if there are any fees for having the account or for inactivity. You should be aware that some accounts will offer $0 fees only for the first year so make sure that you only get one that stays free indefinitely. Depending on where you are in your journey you may also need to choose one with a lower deposit requirement. Make sure that the deposit minimum to receive the desired interest rate is also within your means. You’ll also want to make sure that the bank is FDIC insured and trustworthy. Do your research!

To give you an idea of what this could do for you, I’ll give you my personal example. As I mentioned before, my old account only gained about $0.01-0.03 per month so the only growth it saw was what I deposited into it. Once I discovered the HYS account, I already had my 6 months of expenses ready to deposit. For me, that was $12,000. With that money deposited in a HYS, I started earning around $34 per month! Then that $34 was added to the amount gaining interest so now I was earning $50 because of the compound interest. A year later, I have $800 more dollars than I deposited and I’m earning around $52 in interest payments each month. I didn’t even make any additional contributions and I have seen that much growth! It really is amazing, and I recommend starting one as soon as you can. I wish I had started one 10 years ago. Imagine where I’d be now.

A few additional thoughts to help you get started:
  • Set up a split direct deposit to automatically deposit a set amount into your emergency fund instead of having it all go to your checking account from your paycheck. That way you never get the opportunity to spend it in the first place.
  • Make as many smaller goals as you need. If positive checkpoints encourages you, then feel free to add more goals between $1,000 and 6 months. You could do $1,000, $5,000, $10,000, and 6 months or whatever you need. As long as you’re making progress, that’s the real goal.
  • Feel free to go beyond 6 months savings if you feel you need to. Most of the advice I’ve heard is after you have 6 months saved, you should focus those funds and attention to paying off debt or funding your retirement account. With that in mind, I wouldn’t recommend worrying about more than 1 year’s worth of expenses before switching your focus. Personally, I refocused after funding 6 months expenses.
  • 6 months of expenses will change with time. Reevaluate yearly or whenever you have a major life change to make sure you still have enough to cover your current value of 6 months expenses. Moving cities, buying a house, adding a member to your family – all of these things will change how much you need saved to be able to cover 6 months expenses. Inflation will also change your total. Has your cell phone or rent increased from last year? Reevaluate regularly to avoid being underfunded.

I wish you the best of luck as you embark on the next step to financial freedom. I’m not a financial professional, but this is what has worked for me. Always make sure to consult a professional before making any major financial decisions. Remember, there are no rules, just guidelines!

Categories
Technology

My Favourite Apps for Christmas and Beyond

Here’s a roundup of a couple of my favourite apps. These are a few I use especially around the holidays.

1. Santa’s Bag

Free | In-App Purchases

This is the only app on my list that is actually branded towards Christmas, but it’s a great resource for any gift giving event. Santa’s Bag is an app that helps you organize all of the details around gift giving. They’ve thought of all the details and options – you can even change the decorative Santa’s skin tone in settings if you want.

On the summary page, you can set a budget for your holiday and the menu keeps track of your progress by gifts purchased, gifts to buy, and the total over/under budget you are. It also has a time clock counting down to Christmas.

You can also view your plans organized by recipients. You can log everyone you want to get gifts for and view them as a list. After you select a recipient, you can see more detail for that specific recipient. You can list gift ideas, links, merchants used, preferences, and even set a budget for each specific gift recipient.

Another menu lets you look at all your gifts sorted however you like. I personally like to use the status option which sorts the gifts by whether they are an idea, purchased, shipped, delivered, wrapped, and gifted. They even have an option for handmade gifts and stocking stuffers!

I love this app because it helps me remember the gifts I want to get or have purchased and keep track of where I’m at with each of them, so I don’t forget anything. The best part about this app is, it’s free! There is an in app purchase available to remove advertisement banners if those bother you.

2. AnyList AnyList App Icon

Free | In-App Purchases – Subscription

Now that you know how to organize all the gifts you’re going to get, you going to need ideas on what everyone wants. The perfect app for that is AnyList. Now hear me out because you may know AnyList as a grocery app. That is exactly what it is, but due to its shared feature, it makes it the perfect app for wish list sharing. My family uses AnyList for a shared grocery list. It’s great because it updates the list in real time on everyone’s phone so we can all add and whoever is at the grocery can quickly see what is needed.

Another great use we’ve found is that everyone can make their own wishlist and share it so we can see ideas of what everyone would like for birthdays and Christmas all in one place. The app has built in categories that you can use to organize the items or you can make your own. You can also add notes and links to help would-be gift givers understand better than just the tagline might allow. We use this to link to Amazon wishlists or certain specific products or add sizing information.

The only thing is you have to make sure everyone understands that the only person who can make changes to a wishlist is the owner. Since everyone sees the changes, if you cross something off the list then it gets crossed everyone’s list and it ruins the surprise.

The base app is free which allows you to do everything I mentioned before plus add recipes and meal plan, but you can also opt to subscribe to AnyList complete which adds the ability to put pictures on items, sort by aisle in the grocery store, use AnyList on a desktop computer, import recipes, add item pricing, turn on a passcode lock, receive priority support among other features. There are options for an individual subscription or a household subscription that lets you add others’ emails to your subscription. We’ve been happy just using the free version, but some of those features in the upgrade do sound awesome. I think you’ll be happy with the app either way you choose.  

3. PackTheBagPack the Bag App Icon

Free | Pro Version Available

Pack the Bag is another app I use year round to plan my travels both big and small. I’ve tried so many packing apps and this one is the one I come back to time after time. The app comes preloaded with lots of items you can choose to add to your packing list, but you can edit or add new ones to be more specific to your packing needs.

The items are primarily sorted by category. You can edit categories or add new ones if you like. You go down the list and choose which items you want to add to your packing list. If you fill out the dates of your travel, there’s even a shortcut that will automatically add 1 item for each day of travel. That’s great for things like underwear and socks that you use everyday. The best part about the categories is you can minimize them to allow for quicker navigation and reduce visual clutter when you’re using the app. Sometimes the same item is listed in more than one category, but the app will tell you if you’ve selected the same thing twice in different categories. I really like the suggestions already built in. They even had things I sometimes forget to include in my list when I do it from scratch. You can also add pictures and weight to each item. The app will actually total the weigh of your items as you pack them. Anything you add will stay in the list of options for any future lists you might create so taking the time to detail the items is nice for later trips to benefit from.

While you’re packing, you can turn on a filter that only shows unpacked items. Again, reducing visual clutter so you can see quickly what is still left to find. You can also turn it off to see everything or see just packed items.

The app is free and so useful as is, but as most free apps are there is an option to upgrade to Pack the Bag Pro. It is sold as a separate app which costs $3 in the app store.

4. SplitwiseSplitwise App Icon

Free | In-app Purchase – Subscription

If you are doing any traveling or perhaps going in on a group gift, this app could help you a lot. This app takes any purchases and splits them as you want. You can do one time purchases and assign who is involved, or you can make a group and add multiple purchases from multiple people in the group.

As I mentioned before, you can have the app split it equally, but you can also choose other ways to split the payments as well making it really flexible. You can also choose whether you want traditional paybacks or you can choose to simplify payments. When you select this option, the app does the math to have everyone just do 1 payment instead of several redundant ones. So for example if Susan pays for something for herself, Bob, and Jeff and it cost $90; then Jeff pays $120 for the group. Instead of Jeff paying Susan $30, then Susan paying Jeff $40; the app would just tell Susan to pay Jeff $10. That’s a simple example, the app will take even more complicated scenarios and just tell everyone what they owe and to who – it’s awesome!

Something I don’t love about this app, it requires you to put in the participants email instead of allowing just names. It confuses people sometimes and not everyone wants to download the app. Now they don’t have to, but it does still email them. I do wish there was a way to track on your own without adding emails especially when I’m just trying to track for myself or I know that others don’t want the app. It’s a really good app other than that. Plus, if everyone downloads the app, then anyone can add their own expenses in real time.

Splitwise also integrates with PayPal and Venmo so the participants can link straight from the app to make a payment. Then the app updates automatically that a payment was made and updates the status to settled. You can also mark payments manually if you choose to settle up in a different way than the integrated options.

I use this app with my friends and family frequently for group trips, splitting food costs, or going in on annual costs.

The app is free, but does have a Pro option done as a subscription for $3/month or $30/year. Pro allows you to scan receipts, go ad-free, currency conversion, itemize expenses, plus other features.

5. RecipeBoxRecipe Box App Icon

Free | Optional Free Account

I definitely use this app more than just around Christmas, but I tend to be home, ready, and able to make all of my favourite foods in December.

I used to use a different recipe app before they went subscription only. That sparked me to find a great option in RecipeBox. The coolest feature is that it has a Focus Mode that will keep your phone from going to sleep for an hour while you remain in the app. This is great especially when your hands are covered in whatever you are baking and you want to review the instructions or measurements. It takes the most annoying part of digital recipe books and solves it!

You can categorize your recipes by categories, but also mark some as favourites to get back to quickly. You can add notes and urls in addition to the traditional things you expect to find in a recipe.

The app also has a Discover function where you can scroll through recipes or search for inspiration. There’s also a Shopping List and Meal Plan function in this app too so you have options.

I know I already said what the coolest feature is, so I’ll just call this the other coolest feature. You can import recipes directly from websites using your computer. and maybe the other other best part…the app is Free! No in-app purchases or subscriptions, you just have to make a free account if you want to use it across multiple devices or use the import feature.

6. The VaultThe Vault App Icon

Free | In-app Purchases

Finally, I had to add this app because it is just one of the all time best apps, and it always blows peoples’ minds when I introduce it to them. The Vault is an encrypted, secure app that allows you to store valuable information such as passwords or important information. It also allows you to include pictures. It is pretty free form, but it also allows you to search through the app for test to find what you’re looking for quickly.

I store all of my passwords in The Vault. I am able to sort it into categories. For example, I have a category for my blog where I keep the important information for the accounts used to run More Like Guidelines, and less secure information like the specific color codes used for my logo. I also have a category for my wallet. I put pictures of each of my cards in there along with the credentials to login to their apps. That way, if I ever lose my wallet then I have a list of all the cards I need to pause, and I have the phone numbers I’ll need to call. I also have the numbers typed out which helps for online shopping when I don’t want to go get my wallet and it lets me copy and paste.

Now I’ve mentioned a lot of really sensitive information being typed into the app, but of course they have a great solution for that as well. The app has built in features so that when you type something next to something like password, it will block it out with green dots so if someone is looking over your shoulder it isn’t immediately visible. You can slide your finger over it to reveal what is hidden. Same thing with credit card numbers and other data.

One other little pro tip I would give for this app. If you have an account that is associated with your address or phone number, type that into that account’s page. That way if one of those things ever changes, you can just type your address into the search and it will show all of the accounts that need to be updated to the new information.

The app is free, but does have several in-app purchases for some of their more advanced features.

These are some of my favourite apps that I like to use. I hope you find them helpful or maybe they’ll inspire you to go find a new favourite app of your own because, after-all, these are More Like Guidelines anyway.

Categories
Food

My Favourite Homemade Pizza

My favourite food by far is pizza. However, it can be an expensive habit when you’re young and on a budget. When I moved to Atlanta, I was searching for a great recipe to replace one of my favourite pizza places and save some cash.

The biggest change you can make to a pizza is the crust. Finding a good crust was the biggest challenge. I found some good options along the way, but this is my go-to now.

I really like this crust because it stretches and gets thin easily. That was actually one of my biggest struggles when looking for a good crust. So many doughs were too sticky or would tear too easily so it was impossible to get the kind of crust I was trying to emulate. There are so many crust varieties, and I know people have very strong opinions on them. The way I make this crust is to copy Ohio pizza, which is a thin crust, similar to Donatos if you’re familiar with that chain.

Ok first things first, what do we need. I’ve adjusted this down to make 1 large thin crust pizza for 1 – 2 people. If you want to make more, it is easy to scale up.

Supplies

  • Mixing bowl or stand mixer
  • Spatulas
  • Measuring Cups and spoons
  • Pizza stone
  • Pizza peel or cookie sheet
  • Parchment Paper
  • Rolling Pin
  • Rolling Mat (highly suggested not required)

Ingredients

  • 1 cup Flour
  • 3/4 tsp Yeast
  • 1/2 tsp Salt
  • 1/2 tsp Baking Powder
  • 1 1/2 tsp Oregano
  • 1 1/2 tsp Minced Garlic
  • 1 1/2 Olive Oil
  • 3 oz. (6 Tbsp) Warm Water

Steps

Somethings you may notice are odd about this recipe. First you’ll see yeast, but no sugar. This recipe breaks some yeast bread rules, but bear with me. Rules are meant to be broken so we’ll just consider them guidelines.

  1. One thing that makes this easy, first step throw all the ingredients into your mixing bowl in order.
  2. Combine ingredients. If you aren’t using a stand mixer, I find it easiest to use a spatula to combine all the ingredients. Combine until it becomes a ball. Continue to work and knead it for 2-3 minutes. If the dough isn’t coming together or is too dry, add a little more water. If it is too sticky, add a little flour.
  3. Drizzle some olive oil over the dough ball and on the sides of the bowl. Roll the ball so that all sides are coated and won’t stick to the bowl during the rise.
  4. Let the dough rise for 30 minutes in a warm place until doubled. Cover the bowl with Glad Press ‘n’ Seal or saran wrap. A damp towel works too, but not as well. I’ve found that you get a much better rise with a good seal like Press ‘n’ Seal gives.
  5. Spread your rolling mat onto the counter or sprinkle some flour if not using a mat. If you can get the parchment paper to stay in place, you could also try rolling on that.
  6. Roll the dough as thin as you can or like. Be sure to vary the direction to push the dough into a round shape. It probably won’t be a perfect circle, but if that’s important to you roll is past your max size then cut to shape.
  7. Transfer dough to parchment paper before dressing.

Garlic & Oregano Pizza Crust

A nice workable dough to make a wonderful thin crust pizza crust.
Prep Time10 minutes
Cook Time15 minutes
Rise Time30 minutes
Total Time55 minutes
Course: Main Course
Cuisine: American
Keyword: Bread, Crust, Pizza
Servings: 1 Large Pizza Crust
Calories: 524kcal
Cost: $3

Equipment

  • 1 Mixing Bowl
  • 1 Spatula or stand mixer
  • 1 Plastic Wrap
  • 1 Pizza Stone Highly Suggested but not Required

Ingredients

  • 1 cup all-purpose flour
  • ¾ tsp instant yeast
  • ½ tsp salt
  • ½ tsp baking powder
  • ½ Tbsp oregano
  • ½ Tbsp minced garlic
  • ½ Tbsp olive oil
  • 3 fl oz warm water or 6 Tbs

Instructions

  • Mix all ingredient in order to mixing bowl.
  • Mix until ingredients come together in a ball. Add more flour if too sticky, and more water if too dry.
  • Knead in the bowl for 2-3 minutes.
  • Add some oil to the sides of the bowl and roll the dough so each side is coated.
    Let rise for 30 min. until doubled in size.
  • Roll dough out into a circular shape rolling until as thin as possible. Cut to size if too big for your pizza stone or baking sheet.
  • Move the dough to parchment paper before adding toppings.
  • Preheat the oven to 425°F with pizza stone inserted.
  • Sauce and add toppings as desired.
  • Cook for 13-15 min. or until crust is golden and crisp.

Notes

Nutrition Facts
Servings: 1
Amount per serving  
Calories 539
% Daily Value*
Total Fat 8.6g 11%
Saturated Fat 1.3g 6%
Cholesterol 0mg 0%
Sodium 1173mg 51%
Total Carbohydrate 100.6g 37%
Dietary Fiber 5.1g 18%
Total Sugars 0.5g  
Protein 14.6g  
Vitamin D 0mcg 0%
Calcium 175mg 13%
Iron 8mg 42%
Potassium 502mg 11%
*The % Daily Value (DV) tells you how much a nutrient in a food serving contributes to a daily diet. 2,000 calorie a day is used for general nutrition advice.

Sauce

This is my favourite pizza sauce. Of course, you can always use store bought, but I never liked the flavour. Turns out that was one of the reasons I didn’t like homemade pizza for so long.

This recipe, however, is so simple. It also is a pretty good copy of the sauce my favourite chain uses. I use this sauce regardless of the type of pizza I’m making.

Supplies

  • Jar or container
  • Spatula
  • Measuring Spoons

Ingredients

  • 6 oz. can of tomato paste
  • 1/2 tsp Basil
  • 1/2 tsp Salt
  • 3/4 tsp Sugar
  • 9/10 Can of Water

Steps

This is one of the easiest recipes ever.

  1. Take an empty jar. I reuse old sauce jars I’ve collected from my parents, but if you have mason jars or even pickle jars would work (after you clean them out, of course).
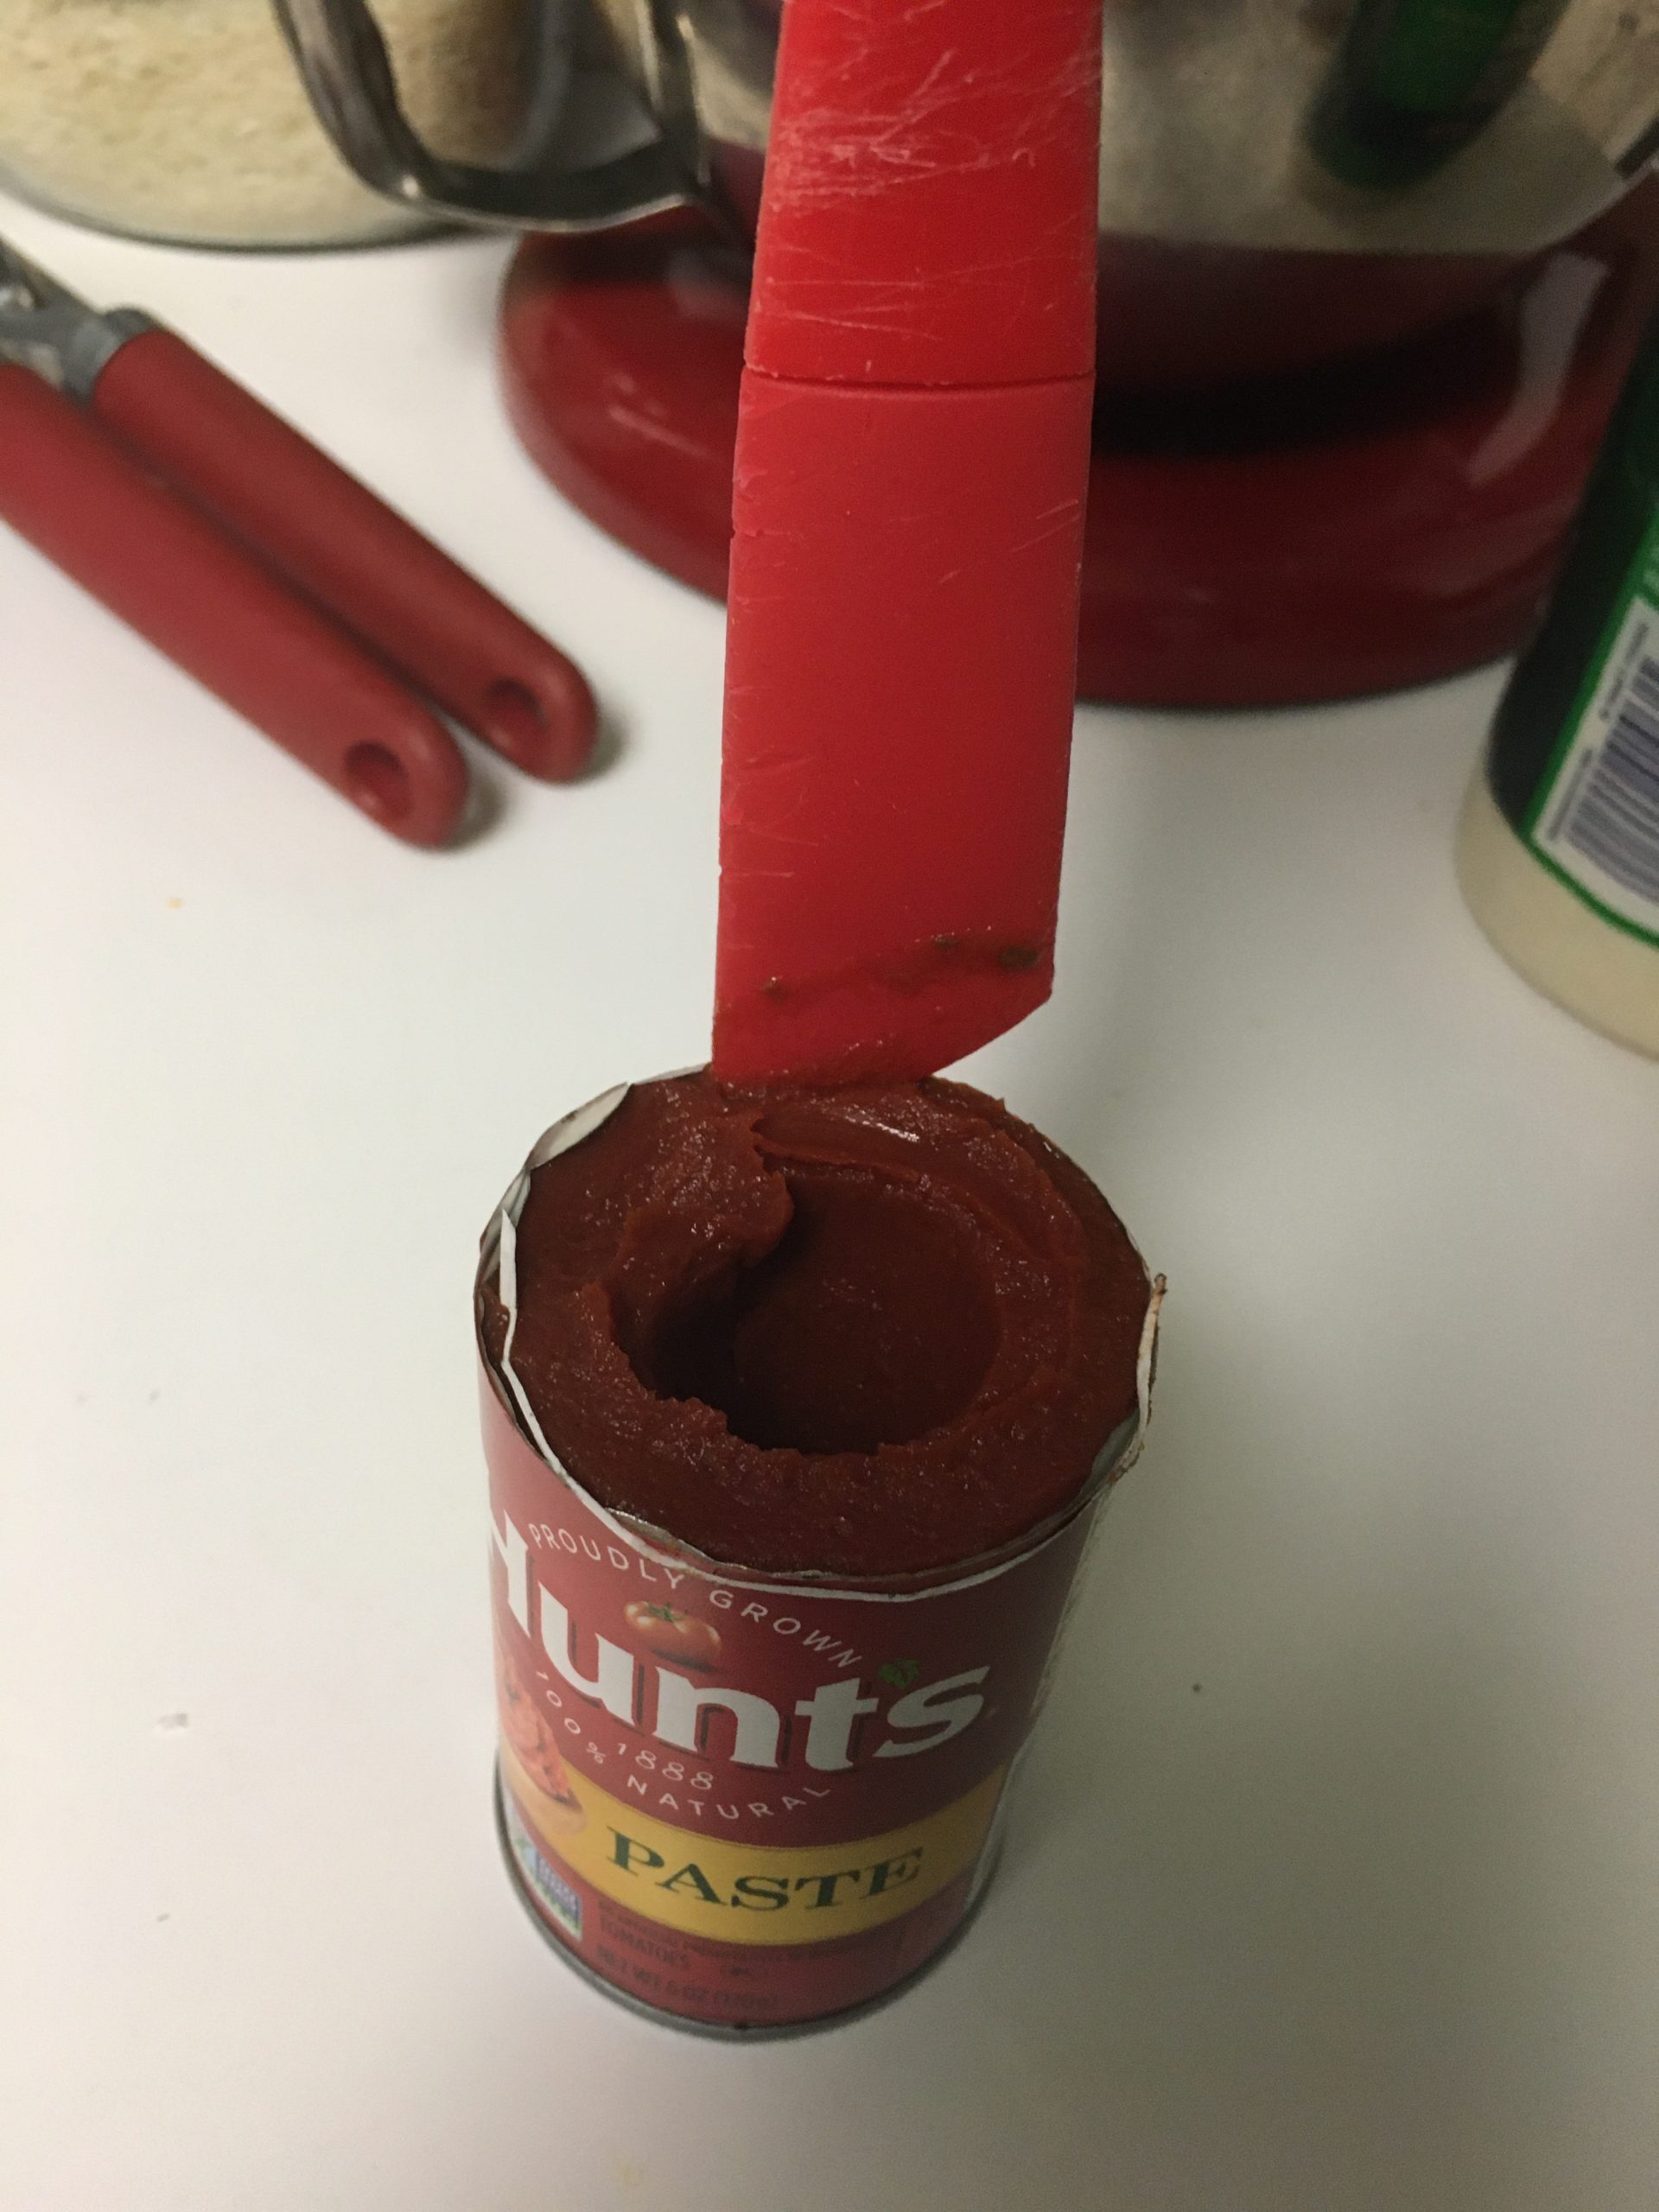
  2. Scoop out the tomato paste into the jar. I have a spatula I love for this, plus it came from the Dollar Tree so win-win! It is the perfect thinness to fit in the can, plus it is double sided so you can use it for the dough too. Red 2-sided spatula on black background
  3. Take the empty can and fill it 9/10 full of water, and add to the jar.
  4. Add the other ingredients.
  5. Replace the lid, and shake well to combine all ingredients.
  6. Let sit in the fridge for 3 days for optimal flavour saturation. Although, I’ve used it immediately too and it still works, but not quite as good.

Pizza Sauce

A simple excellent pizza sauce
Prep Time10 minutes
Cook Time0 minutes
Resting Time3 days
Total Time10 minutes
Course: Main Course
Cuisine: American
Keyword: Pizza, Sauce
Servings: 1 jar
Calories: 329kcal
Cost: $1

Equipment

  • 1 Jar
  • 1 Spatula

Ingredients

  • 6 oz can tomato paste
  • 9/10 can water use the tomato paste can
  • ½ tsp basil
  • ½ tsp salt
  • ¾ tsp sugar

Instructions

  • Mix all the ingredients into the jar. Use the can from the tomato paste to measure the water. Fill to about 9/10 to the top of the can.
    6 oz can tomato paste, ½ tsp basil, ½ tsp salt, ¾ tsp sugar, 9/10 can water
  • Replace the lid and shake to mix all ingredients.
  • Store in fridge until ready to use. Let sit for at least 3 days for optimal flavor, but can use immediately if needed.

Baking the pizza

After you’ve moved the dough to parchment paper. You can sauce it to taste, and add cheese and toppings. I have found that it is actually better to use provolone cheese instead of the typical mozzarella. Give it a try!

I also suggest after you add all of your toppings to add a sprinkle of grated parmesan or Italian cheese and oregano. It really takes it to the next notch of making it taste boughten.

Bake at 425°F for 13 – 15 minutes until the crust is golden and crisp. I find the best time to warm up the oven is after the dough rise. Make sure your pizza stone is in the oven before you turn it on so it warms up with the rest of the oven. I highly recommend a pizza stone. I use it for my breads as well.

To transfer the dressed pizza to the oven takes a bit of a learning curve. Using the parchment paper has made all the difference for me. Use a pizza peel or a thin cookie sheet. I actually bought the pizza pan from the dollar tree for this purpose. Since it is so cheap, it makes me not worried about cutting the pizza on it too.

So, take your transfer tray and line it up with the end of the pizza at the edge of your prep surface. Take the corner of the parchment paper and slide it over to the transfer tray.

Once it is on the tray, you can open the oven and slide the pizza onto the pizza stone. The paper should make it slide slowly and smoothly.

To take the pizza out again, just do the same thing in reverse. It is easier on the way out since the crust will be crisper and everything melded into one.

Cut and enjoy!

Pizza is a personal preference, there are no rules. These are more like guidelines anyway.

Categories
Food

Simple Grilled Chicken

A great staple meal is a grilled chicken. It can be paired with so many other things and is surprisingly easy to make well.

You can keep some frozen chicken breasts in your freezer to make a cheap meal available at any time. This also works with raw chicken too, so whichever you have available.

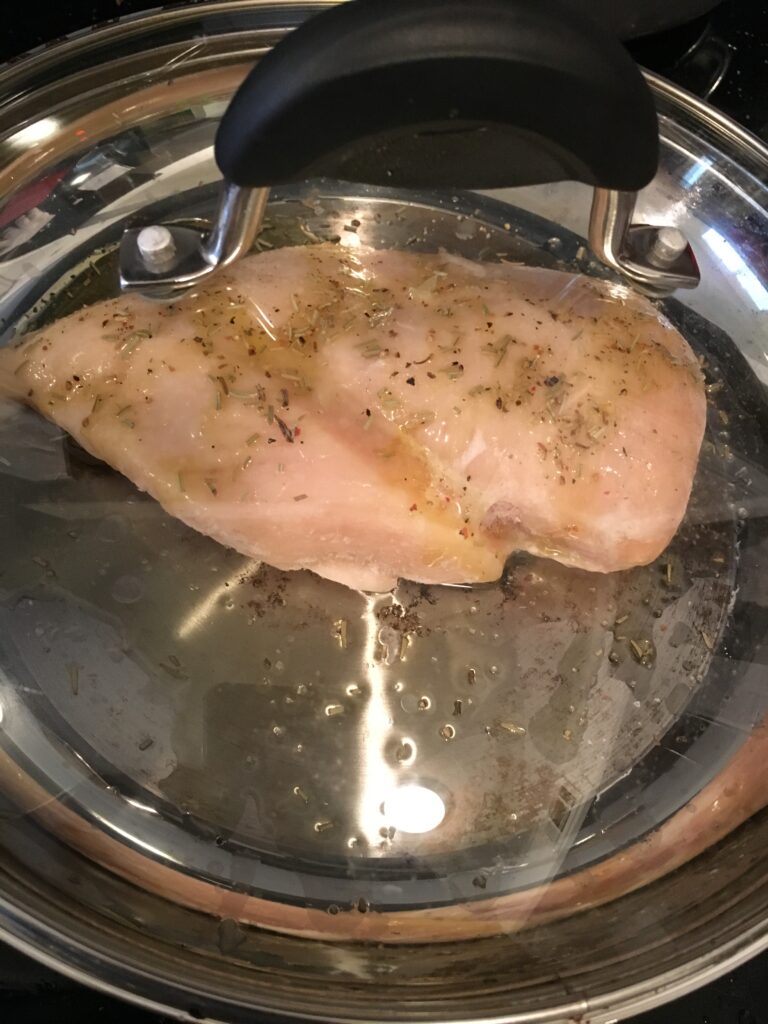
Grab a pan with a lid or you can also use a lid slightly smaller than the pan. It’s important to use a combination that allows you to have a seal when the lid is on. This helps cook the chicken thoroughly while making sure it doesn’t dry out.

Then drizzle some olive oil onto the center of the pan. This is to keep the chicken from sticking to the pan and also adds a little healthy fat and flavour.

Then you just set the chicken on the oil. I also drizzle just a little olive oil on the top of the chicken. This helps keep the seasoning on and a little oil for when you flip it.

Having a clear lid has been great for seeing how the cooking is coming along without breaking the seal.

Speaking of seasoning, this is also very simple. Just a little bit of salt and pepper, and the part that really makes it good, rosemary. Sprinkle a little bit of rosemary on there and it takes the chicken to the next notch.

Once you’re used to the basics, you’ll be able to experiment with other flavors you might want to try. I once added a slice of lemon to a dish with multiple servings. While I liked the flavour, it didn’t pair correctly with the rest of the elements of the meal.

After you dress your chicken, put that lid we talked about on. Turn the stove onto medium heat and don’t pick up the lid. The seal really is what keeps the chicken from drying out, so the less you lift it, the better. Just let it cook for a few minutes. You’ll probably hear the sizzling and see some steam. Basically, just listen and trust your gut, but try not to lift the lid more than once. When the first side is cooked well, flip it and replace the lid. I have found that it is easier to flip chicken by using tongs instead of a spatula.

You know it’s done when the center is cooked thoroughly. I cut into the center just a little bit before taking it off the skillet. As long as it’s not pink you’ll be ok. If you see pink, it’s not done and you could get sick by eating it. To check without cutting your chicken, use a meat thermometer. It should read at least 165°.

Find what works for you, these are more like guidelines anyway.

Categories
Finance Getting Your Finances in Order in Your 20's

Getting Your Finances in Order in Your 20s: Planning for Retirement

You may be thinking “I’m in my twenties, I don’t need to worry about retirement yet”. You may think that retirement is more of a thing you do in your thirties, but actually getting started as early as possible can have a huge payout later on.

Did you know that to retire, someone our age needs to have more than $1 million saved up? It’s ok. You can panic for 30 seconds.

Ok panic is over. Now I’m going to help you get there.

Why You Should Start Early

The first and most important, yet intimating part is you must start saving. Even if you are only setting money aside for now that’s a start. Yay! That was pretty easy. But that is only a temporary solution. You want to get your money into an investment ASAP.

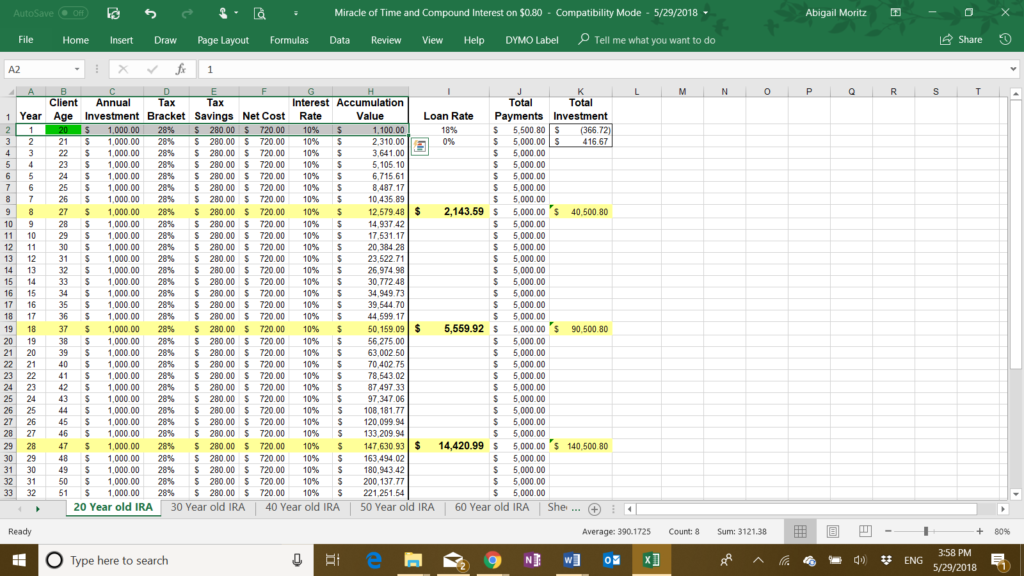
Even beginning investing 1 year earlier can change the final payout by a surprising amount. It’s hard to imagine yourself, but luckily I have a cool little tool that can show you the difference investing early can make. Check it out here to help gain the motivation to start. I received this tool from Robert Moritz, a certified financial planner, and I’m sharing it with you with his permission. He actually helped me set up my Roth IRA so I would definitely recommend looking him up if you’re in one of the states he services (IN, OH, AL, CA, FL, GA, IO, KY, PA, SC, WV).

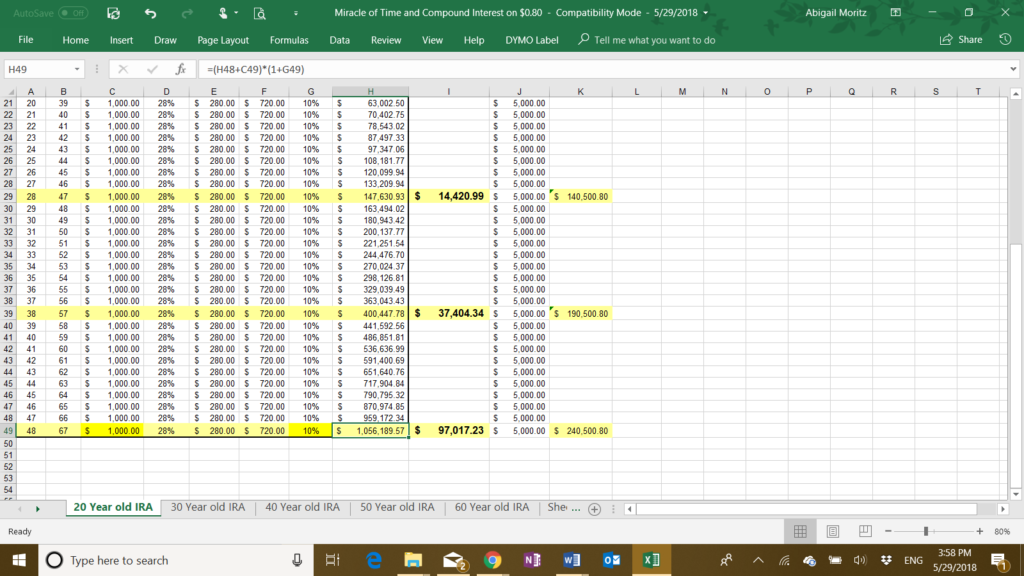
Look at the difference investing at 20 vs. 21 makes.

According to this simulation, investing $1,000 every year starting at age 20, this person had $1,056,189 in accumulated value by only 48.

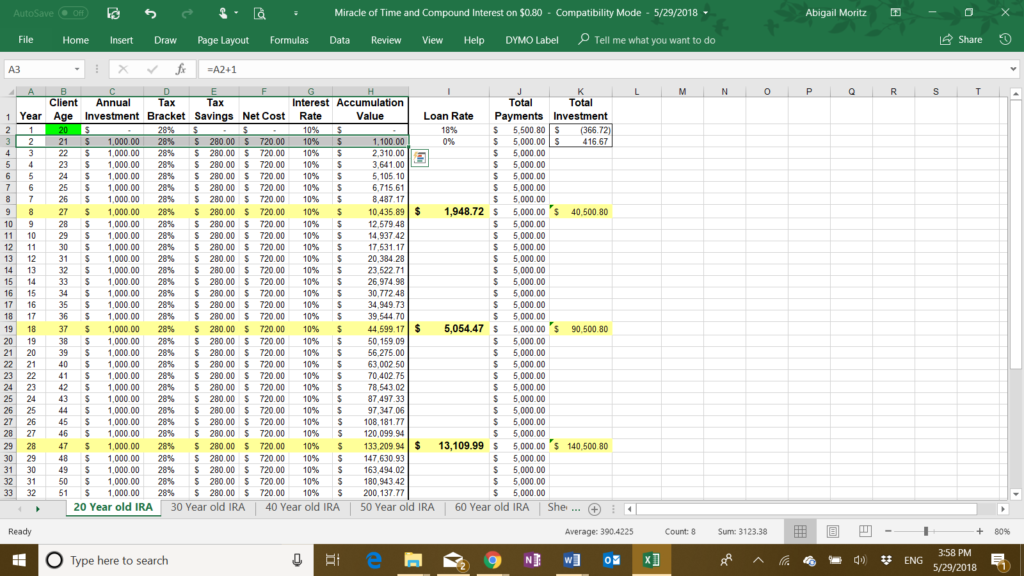
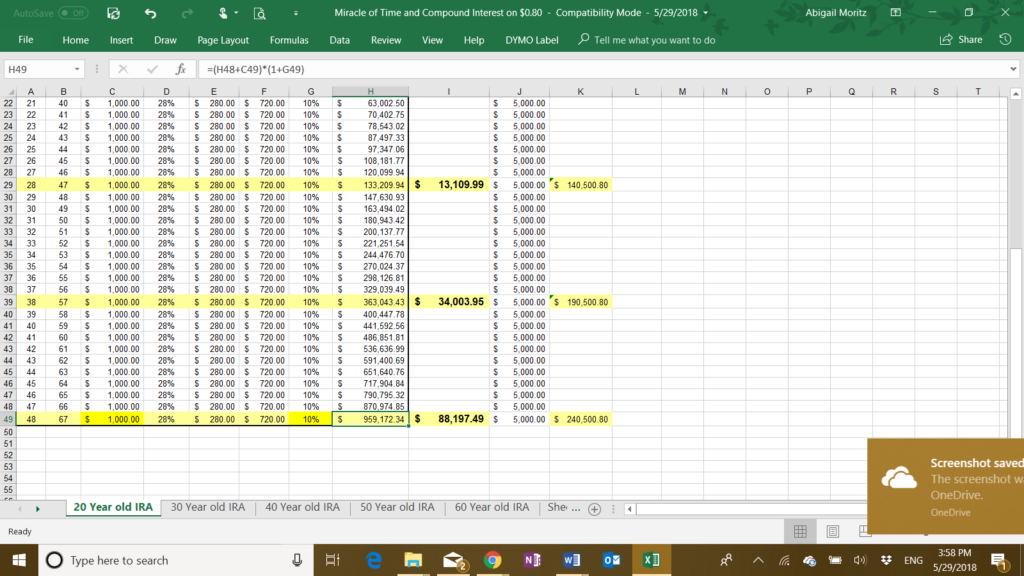
See what happens when they wait just 1 year.

On the other hand though, when they waited to start investing until 21, they only had $959,172 in accumulated value by 48. That is almost $100,000 in lost savings.

Now you see why it’s so important to start investing as soon as you can and as much as you can.

Feel free to play with your own numbers and ages.

Types of Retirement Funds

Two common choices for investing include 401 K and IRAs.

A 401k is usually done through your place of employment as a benefit of working for them. Companies will often offer a “401k match”. Which simply means that whatever you contribute to your 401k retirement fund, the company will also put in a certain amount. You should make it a priority to meet the maximum amount the company will match because that’s just free money. However, don’t limit yourself just to the maximum match amount. If you can, always put in as much as your budget allows.

The simplest way to describe an IRA is it’s a retirement fund for people who don’t have a 401k offered through their work. This will often happen if you work for a small organization, you’re a freelancer, or if you only work part-time. A certified financial planner can help you decide if a regular IRA or a Roth IRA is better. Basically the difference is when the government taxes the money. For myself, I went with a Roth IRA based on my advisors advice. However when I changed jobs, my advisor thought moving my 401k from the old job into a traditional IRA would be most beneficial.

Each of these accounts has a legal maximum you are allowed to contribute each year. This is just another reason you should begin investing early. You won’t be able to make up for it later as easily due to the yearly contribution limits. As of 2021 tax year, the IRA contribution limit is $6,000 for a single person ($12,000 for a couple).

Something very important to remember about retirement funds: you can not take any money out of this account after you put it in until you qualify for retirement. If you take it out early, you will incur some major penalties that will make it not even worth taking the money out. So while you should always put in as much as you can, don’t put in any money that you will need back before you’re 60. This is not the place to save for a car or a house. Keep a savings account you can access for those and for emergency funds.

Remember, a little is better than nothing. Nothing with compounded interest is still nothing. Speak to your financial advisor to find a plan that works for you and your goals.

These are more like guidelines anyway.

*I am not a financial expert nor should this advice be considered legal advice. You should always listen to a certified financial planner before me.